Monday 18 April 2016

CD90Z - seat is reborn.

Well actually the seat wasn't reborn but I was very lucky to pick up a late S90 seat which was in pretty good condition and has the same fittings as the CD90Z.


CD90Z - shocking.

Another job that's now been sorted was the rear shocks. A bit rusty and in need of attention as can be seen from earlier posts.


They were given the same initial treatment as the tank.


A useful tool, cheaply made from a bit of old hardwood and a couple of 10mm threaded rods was this spring compressor - worked perfectly.


And fitted to the bike they look much better! Just need new washers and dome nuts.


CD90Z - tanked up.

A bit more on the S90 fuel tank recently purchased. It was in pretty good condition and a reasonable price.


Using the Rustseal system the tank was de-rusted cleaned and brush primed in a rather nice blue.


After a light sanding I gave the tank another primer coat.


Finally the first of many top coats in black.


CD90Z - blow it!

It's been a while so here's a bit of an update. I sorted the wiring out a bit and temporarily joined wires (I have since put on new connectors and some new wiring). The horn wasn't functioning which was resolved by drilling out the rivets and cleaning the points inside the horn - a bit like contact breaker points. This did the trick and I now have a decent sounding horn for a little 6v model. The horn bracket was also rusting nicely away so a bit of sawing and filing and I made a new aluminium bracket which secures the horn perfectly.


Just the cover to paint.


Friday 25 December 2015

Finally, success in finding a useable tank, sadly it's not a CD90Z but it is a solid S90 tank which will fit without modification. I've also done a bit of other work on the bike - it now sports four indicators. Next on the to do list will be to strip and respray the tank. I need to get the mounting rubbers too. Photos to follow.

Monday 5 December 2011

A new project - a new blog

With work stalled on the CD90Z while I attempt to get some missing parts, I have invested in a new project...... a Honda CG125. No posts yet but I will put on some photos soon. Bike is in a state with lots missing - why do I do it?  Link to the new blog is honda-cg125-1977.blogspot.com

Sunday 19 June 2011

CD90Z - giving up smoking, a bit?


And so time for another movie... in this one it seems the engine smokes less and is a little quieter. It will help when I can get a more suitable exhaust, the silencer I fitted was chopped off from what I believe was a restricted 50cc moped exhaust and clipped to what was left of the original exhaust downpipe from the CD90Z. I had sorted the clutch and I have ridden round the garden on it and have fitted new front brake shoes and footrests just to make it a bit safer. The clutch was solid but having dismantled it, cleaned the lot up and de-burred the tags along with a new cable means it now works well and is quite light.  The current 'sit on the frame' seat isn't too comfortable but I shall have to get that sorted. Loads still to do including sorting the wiring and checking the charging system. and other bit to buy like the rear shocks, tyres, inner tubes etc, etc. Maybe it'll be ready for an MoT next spring, still it was always going to be a slow build.

CD90Z - interesting cam sprocket setup

Following the cylinder & head stripdown I noticed something a bit odd on the method used to bolt cam to sprocket. On investigation in the manual/parts list I discovered bolts were screwed in from the wrong side and had nuts on - ugh. This meant the bolts had slightly caught the head. New sprocket and bolts purchased. I ground in the valves, cleaned up the head cylinder to cylinder surface with fine emery cloth and a sheet of glass. I found a thick felt tip worked well for checking the head was flat. I reassembled the top end with a new cam roller bolt, gaskets and oil seal for the exhaust valve (I did find the old one - totally hardened).

Sunday 29 May 2011

CD90Z - head & cylinder

Time to sort out the smoking. On dismantling the head I found the valve gear and cams in good condition. I then moved onto getting the cylinder off. However this turned out to be a bit of a chore as the bolt for the chain guide roller was seized into the head and had very rounded corners. After attempts with various sockets and spanners I decided to cut a slot and try an impact driver - one broken driver bit later and the bolt was still in place, almost laughing at me. Then I discovered a tool called an Irwin Bolt Grip Remover, I read the online reviews and thought it probably wouldn't work... anyway I went and spent £22 and invested in the set of five sockets. Approximately one minute after walking into my garage I had removed the offending bolt. Amazing, it actually worked so well I didn't believe it had undone the bolt at first - certainly a good bit of kit for the toolbox.
So, cylinder off and I could see the piston. A touch of very light scoring on the piston and cylinder so I think I'll try and get away with it. Lots of yucky gasket goo and a fair bit of cleaning up to do, but the condition of the components was pretty good. One thing I did find, or rather didn't find was the oil seal on the exhaust valve guide... no sign of it so maybe that could be a major cause of the smoke - fingers crossed.

Monday 16 May 2011

CD90Z - under the covers


I took the covers off today, I thought I'd better see what horrors lay hidden underneath. But it was a pleasant surprise as you can see, especially considering the amount of water that was in engine 10 years ago when I got the bike off my brother. Now cleaned out and looking good, I'm intending putting the covers back on using stainless allen bolts and new gaskets I bought off ebay.  A bargain I thought  - two complete engine sets (one missing a head gasket) for around £9 plus postage. As a matter of interest I bought a couple of cables off John Oldfield, a non-franchised Honda dealer, great price and fast delivery. I've now ordered brake shoes and some other bits - a useful source, have a look (the link is top on my links list at the moment). Please mention the blog if you use him, he might give me a discount!  Here is the link just to make it easier.  

Thursday 5 May 2011


Ok, just to prove that the CD90Z will actually start and run here is a first video. Excuse the rattling noise - it is not the sound of the engine it is in fact the rear light and number plate holder which I've yet to secure properly. Considering that I haven't tuned the carb, or ignition and have only put in a new plug and fresh petrol it runs quite smoothly. The exhaust silencer is chopped off an old exhaust, (no idea what from), and connected to what was left of the original exhaust system with a jubilee clip. The carb is fed from an old lawnmower petrol tank. The spark is powered from a 6v transformer (no battery as yet) and the ignition switch is two wires twisted together. All a bit Heath Robinson but the good news is that it starts pretty easily. I put in some fresh 20/50 oil I had lying around but will be taking off the cases and inspecting prior to putting in the correct oil and refitting cases with stainless bolts. Still loads of work to do and lots of bits to acquire but the rebuild is at least progressing well.  I'm hoping to pick up a few bits at the BMF rally in Peterborough.

Tuesday 26 April 2011

CD90Z - Top coat

I spent this morning starting to re-assemble the bike.  Disappointing finish with the top coat, it still looked like a satiny fine sandpaper finish despite being sprayed this time. However I've decided to go ahead and put the bike back together as at least the anti rusts coats plus brushed topcoat then sprayed topcoat should protect the metalwork well.  Looks like a bit of a rat bike but it will do for the moment to check out the mechanical parts.  I now need some stainless bolts, decent shocks and lots of those fiddly bits that have rusted away! As a fair bit of the chrome has gone that will also be black for the moment...

Sunday 24 April 2011

CD90Z - RustSeal

A few photos of some of the brush painted parts. Great finish easily achieved. It seems really tough too. I then brushed on the KBS Black Top - big mistake I should have sprayed it. Totally different finish with lots of small bubbles even though I brushed it in the same way. Having searched Google it appears that this often happens and spraying seems the way to go. The moral is always spray Black Top if you need a decent finish, mind you that's hoping I can get it to spray well.  Ah well, out with the abrasive paper...

Friday 22 April 2011

CD90Z - pre-paint prep

Finally started to get the bike ready for painting. The photo shows frame mudguards and various bits following AquaKlean and RustBlasting now ready for using the KBS RustSeal to sort the priming of the parts.  The KBS RustBlast gives an interesting etched finish to the metal, looks much better than it did.  Not too much rust considering the amount of time it spent outside in all weathers, Honda must have used a decent quality of steel back then.

Wednesday 23 February 2011

Re-registered CD90Z

Good news in the post today.... A V5 for the CD90Z bearing the original registration number. In the end it was a pretty easy task thanks to the help of the guys from the East Anglian Cyclemotor Club. They inspected the CD90Z and checked over my application forms and sent them off. Once inspected the process was very quick - maybe I was lucky as you hear some bad stories regarding the DVLA but on this occasion they were very efficient. Not sure what photo to put with a tax form story so I thought I'd put an old photo of me with a CA160 I owned in a former life!

Sunday 23 January 2011

CD90Z - the renovation continues.

Just to prove I am still doing the odd bits on the bike here are the next seat repair photos. First one is after the electrolysis a going over with Kurust. I then painted it with some old rust preventing primer I found in the  garage.
Then it was a coat of red from an aerosol a relic of an old Sherpa I once owned.  At last I was ready for a bit of fibre glassing...
First face done and a check to see if it still fits ok.  Which it does.  It is already a lot more robust. I left the extra fibre glass sheet on the edges so I can turn it over to form the missing sides of the seat.  As a matter of interest, the resin and hardener was given to me by my brother 10 years ago and it still worked perfectly - just in case you have some old stuff in the shed and are wondering if it is still any good!
With the second face done it is starting to look more like a seat base again. the next stage will be to form the missing sides of the seat which I will the cut to shape once I have put sufficient sheeting onto the base.
While I've been tackling the seat base in the garage, I've also been putting the cover together in the warm.  From the pattern I made, (see below), I cut out the leather off an old settee. Some piping formed from white leathercloth means I now have a real battle to get the needle through.  Anyway I have managed to tack it and am slowly hand stitching with closer stitches.  I have more leather to add to the bottom edge of the cover. It is starting to look pretty good - hard to tell in the photo without the seat foam padding it out though.  Probably time to order some paint to start on the frame and a set of bushes for the swing arm while I am at it.

Monday 10 January 2011

CD90Z - more seat work

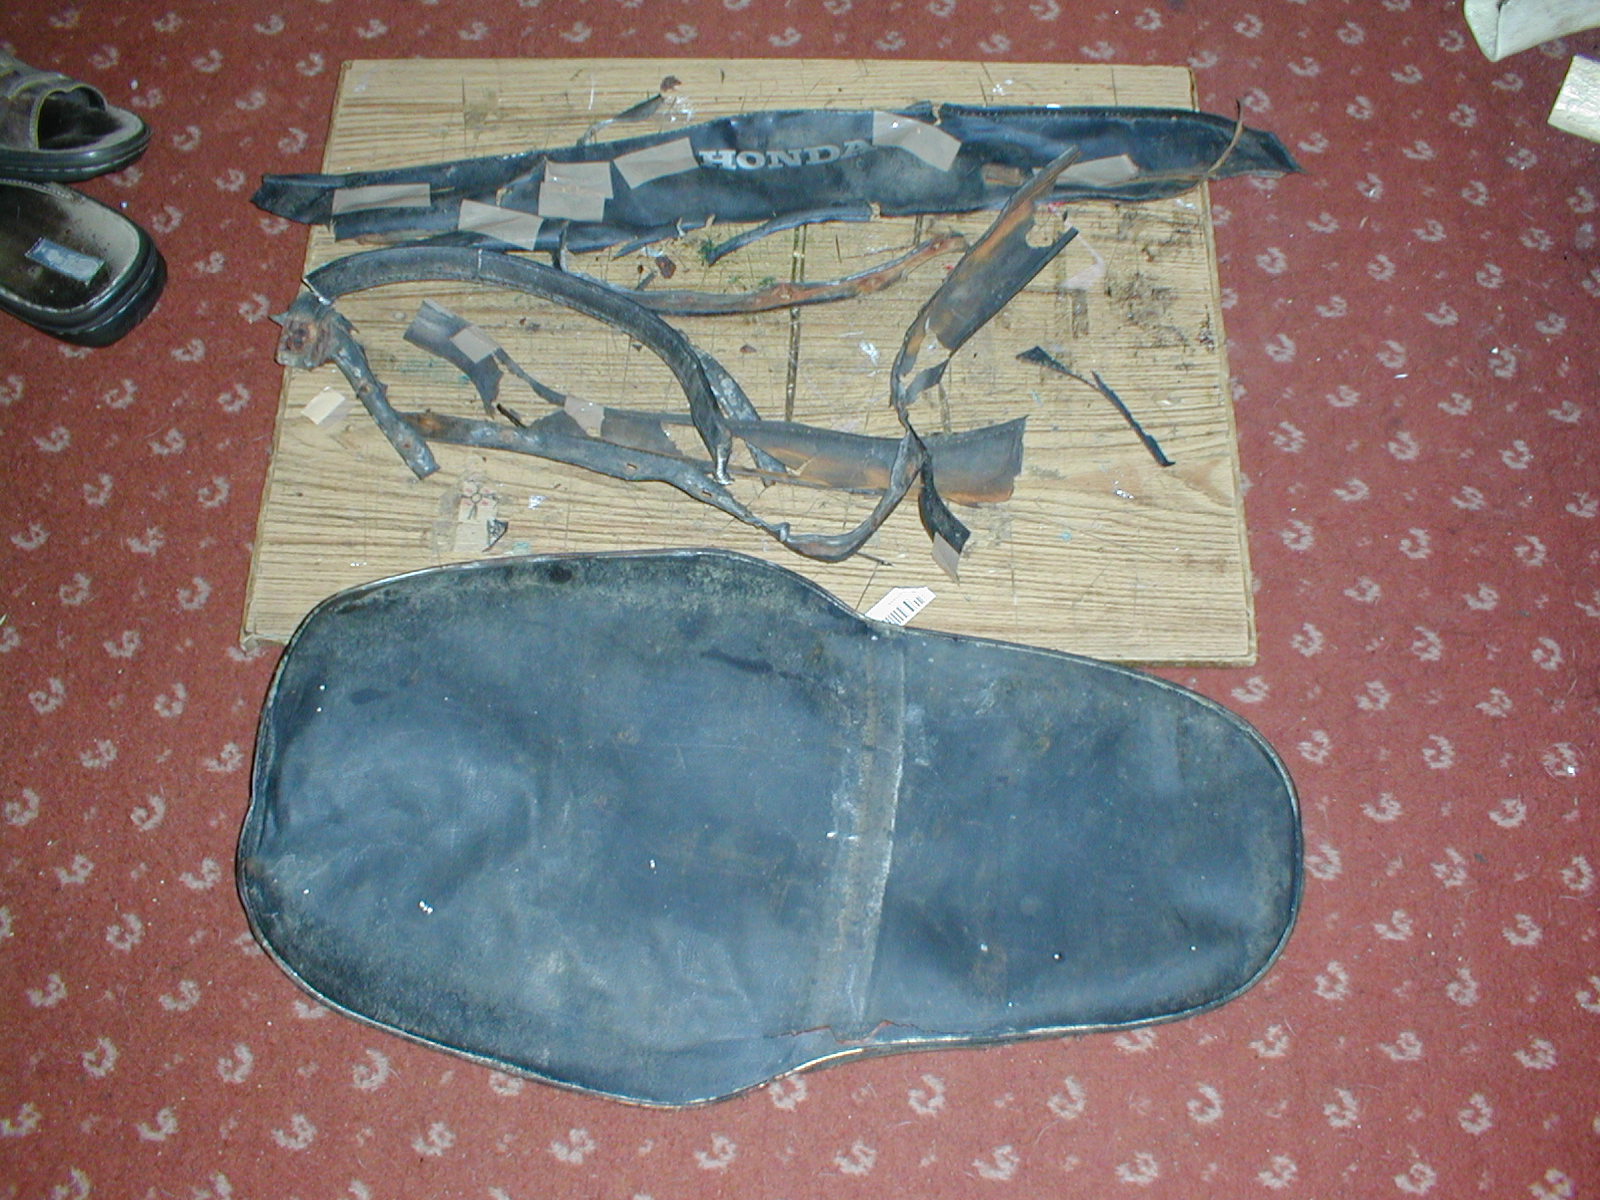
I thought it was about time I started work on the CD90Z after the Christmas festivities.  The seat seemed a good place to begin.  A quick tap and it fell apart. So I unpicked the cover, or what was left of it, the years and weather had made the vinyl very brittle.  

A bit of sticky tape and some imaginative drawing round what was and wasn't there and I had a pattern. More sticky tape and I had something that actually resembled a seat cover.  Result!
But what of the seat base.  After dismantling it looked like this...
Not that much left of it, but as I intend to use an idea put forward on the c90club forum, to encase the rusty hulk in fibreglass that shouldn't be too much of an issue.
However I thought I may as well try out the electrolysis idea and see how well it works.

An old plastic dustbin, some washing soda, a 12 volt battery charger, a bit of steel sheet and some water and I was ready to go.  A couple of tablespoons of soda in the water, connect the negative lead to the metal you want to clean, the positive to the scrap and switch on. The process gives off hydrogen gas so don't touch the two bits of metal or you may need a new shed/garage.  Anyway it really seems to work rather well and the horribly rusty seat base is beginning to look a little better.  Next bit will be to start making the cover, I have some nice burgundy  leather off an old Chesterfield........

Saturday 25 December 2010

Re-registering Honda CD90Z

I took the first steps in re-registering the CD90Z.  A quick reassembly of the bike to show that it is more or less complete and is a CD90Z was undertaken - it now looks like the photo.  I contacted the East Anglian Cyclemotor Club (link on the right) who have an interesting site, lots of info, and are authorised by the DVLA to verify form V765 for smaller bikes. The EACC have provided some very useful advice which included getting a photocopy of my original logbook certified by my local DVLA office so I can retain the original and send off the photocopy for verification of the V765 - saves losing my green logbook.   As a matter of interest the local DVLA office didn't charge for providing a certified copy of the logbook, I just popped in and they did it while I waited.  The EACC charge £10 for the verification, plus an additional amount for expenses for an inspection of the bike which hopefully won't be too much as they have a member who is local to me.  More on how this process pans out as I go through it.

Monday 13 December 2010

Another old photo CD90Z

And here's a photo of the CD90Z back in the 70s, the identity of my brother has been disguised to protect him - he needs it with that hair!
It was a sparkly bike back then.

Sunday 12 December 2010

CD90Z renovation aspiration!

Well this would be nice, not perfect but a lot better than the rusty bike I have now! My brother kindly provided this earlier pic - not from when he first owned the bike but a few years after, when it was no longer ridden but sitting quietly outside (horror of horrors). It appears to have been in pretty good condition still. This photo has the reg number clearly visible which will hopefully help when it comes to getting the bike re-registered with DVLA. I am hoping to find a photo off an early 35mm slide that shows the bike in its heyday, which should be even better for the inspiration to press on with the rebuild.

My latest job has been to chop the spokes off the front wheel to prepare the hub for re-spoking. Offsets measured and photos taken of course! 
I am considering which paint system to use, I quite fancy the KBS paint system http://www.therustshop.com/shop/ which looks like it could possibly be better than POR-15 over bare metal.  Anyone got any experience of it? I'm intending brush painting to get a good coverage and it looks like you can still get a really smooth, tough finish.